
Related Articles


Dhodha is a sweet popular in the Northern part of India. Traditionally, it was prepared during the winters to ward off the bitter cold since the sweet incorporates ghee and lots of dry fruits.
Nowadays, versions of this sweet are sold at almost all sweet shops. The taste though, differs markedly. The North Indian Dhodha is definitely more robust in its taste. Nah! I am not partial to the region. I am just partial to the sweet that they make there.
It is an easy recipe but it does involve watching over the milk like a hawk. The end result is a fudgy, chewy decadent barfi with an unmistakable taste of nutmeg. I prefer to add nutmeg although many traditional recipes do not. This barfi can be prepared in bulk and stored for up to 2 weeks at room temperature in winters.
To make this barfi, the basic steps remain the same as that in making milk cake (another yummy favourite of mine).
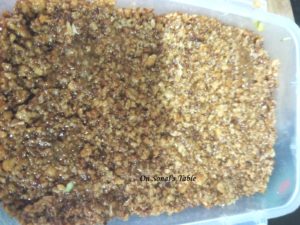
The westerners have their granola bars. We Indians have the …
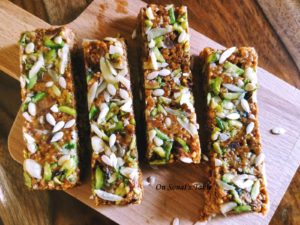
DHODHA BARFI
INGREDIENTS
1 litre full cream milk
½ cup sugar (regular, granulated white sugar is fine)
1/2 tsp of cardamom powder
1/2 tsp of nutmeg powder
1 tbsp water (regular tap water). I prefer to add rose water for the extra aroma. But, tap water works too.
1 tsp lime juice (dissolve the lime juice in the tap water and then add)
2 tsp ghee (clarified butter)
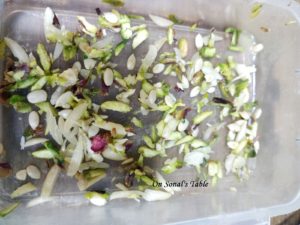
½ cup chopped dry fruits and seeds. I prefer to use slivered almonds (blanched) pistas, watermelon and muskmelon seeds (peeled, obviously!)
METHOD
- Boil the milk in a heavy bottomed pan.
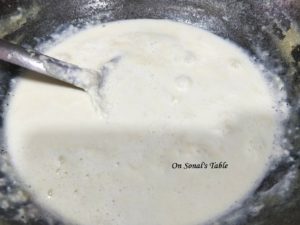
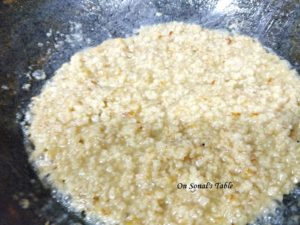
- Stir continuously till it reduces to 1/3rd (1/3rd and not 1/4th )of its original volume. So, basically at this point we are just thickening the milk just as we would to make the Indian sweet rabdi. This should take you anywhere between 45 minutes to an hour depending on the heat applied.
- Note – stirring and stirring well is vital to this recipe as the thickened milk has a tendency to stick to the bottom of the container. That is also why it is advised to use a heavy bottomed vessel.
- Once the milk is sufficiently reduced, lower the heat. Dissolve 1 tsp lime juice in 1 tbsp of water and add to the thickened milk. You will notice that after the addition of lime juice (that acts as a curdling agent), the milk will start to split.
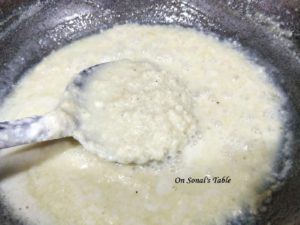
- Keep stirring gently till the milk starts to show a grainy texture. Note – do not at any cost add more lime juice. If you do then the milk will split further and you will get cottage cheese and whey.
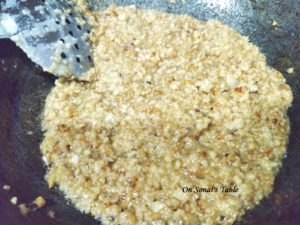
- Grease a flat bottomed dish with the remaining tsp of ghee. Sprinkle half of the dry fruits on top of the ghee layer so that they stick to the bottom. Keep this aside. We will pour the barfi mix on this later to set.
- By now the milk will be quite thick and will have a grainy texture as the whey will not have separated completely. At this stage add 1 tsp of ghee. Stir more till the water in the mixture evaporates and the mixture will leave the sides of the pan. Note – make sure that the mixture is not too dry otherwise it will yield hard barfis which will be more like granola bars. Add the sugar and continue stirring well. The mixture will change colours in this period and will become brownish.
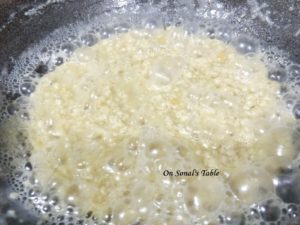
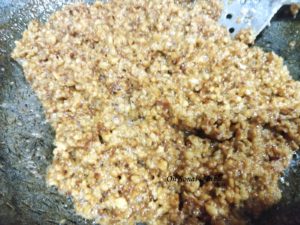
- This process should take about half hour.
- Note – an important step here is that if your mixture has turned brownish but has more water then simply remove the water. Also, after adding the sugar and mixing, continue to stir.
- Stir in half of the chopped dry fruit (you can add cashews etc also…totally up to you). Sprinkle in the cardamom powder and the nutmeg powder.
- Remove the mixture from heat (while it is still soft and pliable and gently ladle it over the flat bottomed dish with the dry fruit layer at the bottom.
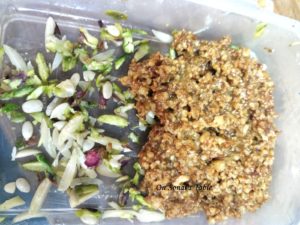
- Press it down with the help of the back side of a flat spoon.
- Cover it and allow it to cool naturally. It will harden as it cools. No need to refrigerate but I do advise you to let it set for at least 4-5 hours or until it is totally firm. Otherwise the barfi will break when you cut it. If after 4-5 hours, your barfi is not set then you can place it in the fridge (not freezer at any cost!) for about 15-20 minutes or till it is set completely.
- To serve, loosen the sides by running a knife around the inner edges of the dish and gently invert it over a plate so that the bottom with the dry fruits becomes the top.
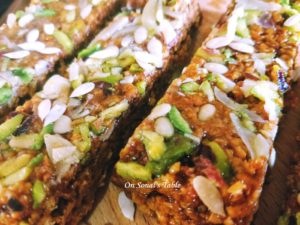
- Cut into chunks and serve.
Note – Some recipes add broken and sprouted wheat (dalia sprouts) or semolina (suji/rawa) to the recipe during the roasting process. For the above recipe, if you wish to add that then you may add 1 tablespoon of either ingredient. Or, if you want the shortcut version of this recipe then you can simply use mawaa/khoya instead of reducing the milk.

Delicious and Exquisite!
Recipes from Sonal always comes out awesome without exception and this one is no different.
Way to go Sonal!
Thank you 🙂