Related Articles


There is something incredibly delicious about the aroma of cinnamon and vanilla. One whiff and it lifts your spirits right up. At least that is what I think and that is also the reason why I bake with cinnamon so much.
When I teach my daughters to bake, I often tell them that cinnamon and vanilla is a marriage made in heaven. Of course, they laugh at me. But, the truth is what the truth is. Why deny the obvious, right?
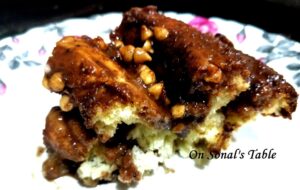
My cinnamon swirl roll with choco-chips and chocolate icing is one such delectable dish that incorporates both these ingredients. The kids love it. Actually, the kids eat anything that has the words chocolate and icing in it. But, this one recipe is a family favourite. The original recipe is adapted from sally’s baking addiction. I have tweaked it a bit to incorporate chocolate.
It is an easy, no fuss recipe which gives the softest, fluffiest, tastiest roll. It literally melts in the mouth.
CINNAMON SWIRL ROLL WITH CHOCOLATE ICING
INGREDIENTS
- 2 and 3/4 cups all purpose flour + 1/4 to 1/2 cup extra for kneading (if required)
- 1/4 cup granulated sugar
- 1 teaspoon salt
- 2 and 1/4 teaspoons dry, instant yeast
- 3/4 cup milk (whole fat is preferred)
- 1/4 cup (4 Tablespoons) unsalted butter
- 1 large egg, at room temperature
THE FILLING
- 1/4 cup (4 Tablespoons) unsalted butter, at room temperature
- 1/4 cup packed light or dark brown sugar(you can use regular white granular sugar too but brown sugar tastes better)
- 1 Tablespoon ground cinnamon (powder)
- 2 pinches nutmeg powder (optional)
- ½ cup chocolate chips (semi sweet)
CHOCOLATE ICING
- 1 cup icing sugar
- 2 Tablespoons milk or heavy cream
- 1 teaspoon pure vanilla extract
- 2 teaspoon cocoa powder
- ½ teaspoon instant dark coffee
METHOD
How to make the dough?
- In a mixing bowl, mix the flour, sugar, salt, and yeast together and keep that aside.
- In a microwave proof bowl heat the milk and butter together at 20 second intervals (stirring at every interval), till the butter is amalgamated into the milk and the mixture is warm to touch (not hot). The ideal temperature for yeast to activate is between 38-43 deg C.
- Pour this warm milk mixture over the bowl containing the flour mix and add the egg.
- Using an electric mixer with a paddle attachment (or a hand held electric mixer), beat the mixture till the ingredients come together in a soft dough consistency. You can also do this with a stiff spatula and hand. I prefer to use the electric mixer as it gives faster and more uniform results. You can identify the dough’s readiness by beating to the point when it no longer sticks to the side of the bowl and starts to pull away.
- Note – I use instant yeast which can be directly added to the recipe ingredients. However, if you use active dry yeast then you have to activate it first. To do that, add the yeast into the bowl of warm milk and butter and mix well. Cover it and keep it side for about 15 minutes in a warm place till you see the yeast activate (bubbles will appear at the top and the mixture will start to froth). Then add this mixture to the flour and continue the rest of the steps of the recipe.
- Sometimes, the dough may appear very sticky. In such a case, you may add 2-3 tablespoons of flour (as needed). Once the dough consistency has been achieved, spread some flour on the countertop of your kitchen and tip the dough atop that. Knead the mixture with your hands for about 3-4 minutes. You can add more flour if the dough still appears to be sticky. This kneading is vital to ensure yeast activation. After 3-4 minutes the dough will start to feel spongier and will no longer stick to the hands. You can perform the finger test to check the readiness. Simply, push the dough back with two fingertips. If it feels spongy and springs back up then it is done. If not, then knead it for a further 1-2 minutes.
- Do not, under any condition, overuse extra flour. We need the dough to be on the softer side. Hard dough will not rise much and will give a dense roll.
- Once done, grease a bowl and keep the dough in that. Cover it with a towel and keep aside for about half hour in a warm place for the first proofing.
How to make the filling and add it?
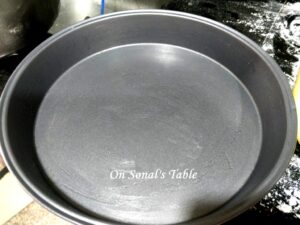
- While the dough proofs, grease a 9 inch baking dish and keep that aside.

- After half an hour you will notice that the dough has risen slightly. Take it out of the bowl and shape it into a ball.
- Sprinkle some flour onto the kitchen counter top and with the help of a rolling pin, roll the dough ball out into a rectangular shape.

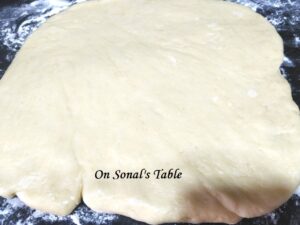
- The size of the rectangle should be about 15 x 12 inches. This size ensures that the thickness that we need for the roll is adequate.
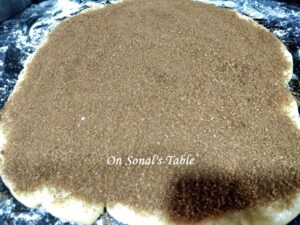
- Take the softened butter, set aside for the filling, and smear it on top of the rolled out rectangle. Make sure you do this evenly.
- In a small bowl, mix the cinnamon and brown sugar.
- On top of the butter, sprinkle the sugar + cinnamon mixture evenly. Make sure to cover even the edges.

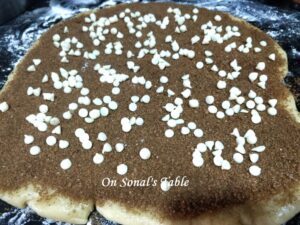
- Sprinkle the chocolate chips on top and gently press them down. They may not embed into the dough and that is fine.

How to shape the cinnamon swirl roll?
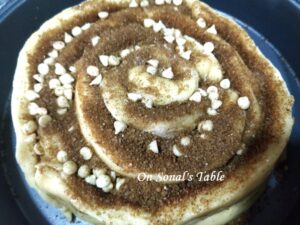
- To do this step you will need a very sharp knife or preferably a pizza cutter with a rolling blade. Depending on how well you have rolled out and cut the dough, you should get 5 to 6 strips. Just make sure that they are all even sized.
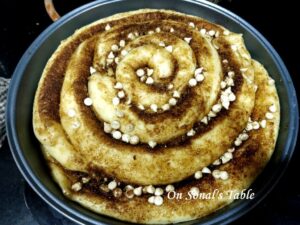
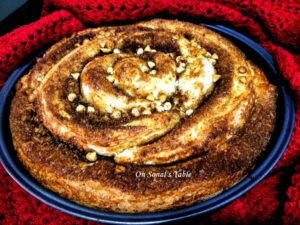
- Cut the above, rectangular piece of dough into 2 inch wide strips. Take one strip and roll it into a loose swirl. This will be the center of the swirl so place it in the center of the pan. The rest of the strips will come around this main strip quite like a rose shape.
- Take the next strip and roll it around the centrally placed swirl, starting where the first one ended. Continue this step till all the cut out strips have been added and you have one giant swirl in the baking dish.
- If any chocolate chips dislodge in the transferring process then you can simply pry the folds apart gently and add evenly sprinkle them. If any of the brown sugar falls in the pan during the shaping process, you can collect it and sprinkle that over the swirl.

- After the swirl is shaped, cover it with an aluminum foil (it should be loose because the dough will rise to double its size as it proofs. We don’t want it to stick to the aluminum foil). You can also use cling film.
- Keep aside the covered dough for at least 1.5 to 2 hours or till it is double in size. It should be left to proof in a draft free environment which is warm. That is how the yeast shall activate more and do its magical job.
How do I bake the roll?
- Preheat the oven to 180 deg C.
- Bake the swirl bread at this temperature for about 30-35 minutes till the top is a nice golden brown. Oh, and I tell you….the aroma…hmmm….ambrosia! I kid you not. If you feel that the tops are browning too quickly and the bread might burn then mid way through the baking, cover the roll with a silver foil.
- In a microwave oven this baking may take up to 45 minutes.
- Once done, remove from the oven and set it aside.

The final act – the yummy chocolate icing
Making the icing is the easiest thing. Just whisk the milk, sugar, coffee, cocoa powder and vanilla essence together into a smooth consistency. Dribble this over the cinnamon roll while the roll is still warm. That will help the icing absorb better. If you want a thicker icing, add a bit more icing sugar. If you want a thinner icing, add a spoonful more of milk.

That’s all there is to this recipe. Dig in and enjoy. Satiate your soul with the tantalizing aroma and the taste. There is nothing that beats its fresh taste. When I make it, it is over in a matter of minutes. But, if you do have to save it, then cover and refrigerate it for upto 4 days.