Related Articles


There are some days when we get sick of eating regular food. Or, as we Indians say, we get sick of eating ‘Daal-Chawal’.
Those days, our soul craves succor. It craves sinking its teeth into something delicious or something gooey. Something that is super easy to whip up and satiates both the soul and those omnipresent (I swear!) hunger pangs.
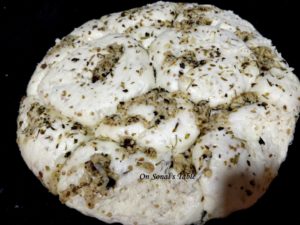
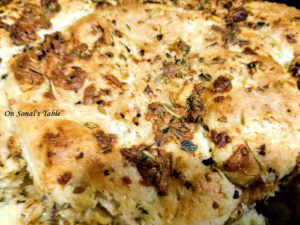
My savior on such days is the super delicious cheese and garlic pull apart bread. It is stuffed with mozzarella and is brushed with generous dollops of garlic butter to ensure that it melts in your mouth. Aah! Absolute heaven, I tell you.
You can serve it hot with a soup of your choice or even as a snack at parties. Serve it any way you want, it is a sure hit with everyone. Here is how you make it.
CHEESE AND GARLIC PULL APART BREAD
INGREDIENTS
For the bread
- 3 ¾ cups all-purpose flour (maida). Divide this into two portions (2 cups in a mixing bowl and the remainder in another bowl)
- 2 tbsp sugar (granulated)
- 1 packet of dry yeast (about 25 gm approx). Bluebird brand is just fine. I use that.
- 1 tsp salt
- ¾ cup warm milk
- ¼ cup water
- ¼ cup butter (must be at room temperature)
- 1 egg
- A block of mozzarella cheese, cut into half inch chunks. Or, if you are using mozzarella balls then about 10-12.
For the butter coating
- ½ cup butter, melted (as in liquid state)
- 2 tbsp grated Parmesan cheese (If you don’t have any, just use any regular cheese. Amul works fine)
- 1 tsp Garlic Powder (If you don’t have any handy then just increase the amount of garlic cloves)
- 2-3 cloves of garlic, peeled and chopped fine
- 1 ½ tsp Italian Herb Seasoning
- ½ tsp of coarse black pepper (must be coarse so do not use powder)
- 1 tbsp finely chopped fresh coriander/parsley (optional)
- Note – Combine all the above ingredients together and keep aside for later.
Note – you can also use some sesame seeds for sprinkling or even chili flakes. Totally up to you and your taste. In order to mix the batter, I used a food processor but you can do it by hand. It may take a bit of vigorous mixing but the net result will be the same. Also, if you would like an eggless version of this recipe then increase the amount of milk by 1/4th cup. So, make the milk ½ cup.
METHOD
- In a large mixing bowl, combine 2 cups flour, sugar, yeast and salt. Mix vigorously and well till all are well combined.
- In a separate microwave safe bowl combine the milk, butter and water. Microwave that on high in 15 seconds interval till the mixture is warm. Make sure it if just warm and not hot. The butter will not melt completely and that is fine. It will appear clumpy.
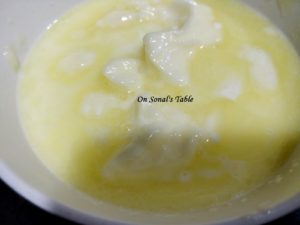
- Add the butter mixture to the above dry mixture of flour and yeast.
- Add the egg and whisk well for about two minutes till you get a smooth paste.
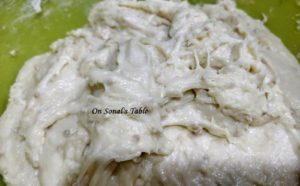
- Add 1 cup of flour (from the 1 3/4th cup that we kept in reserve earlier). Whisk the mixture with for another 2-3 minutes. If needed, sprinkle more flour. The aim is to achieve dough consistency and to make sure that you are able to form the dough into a ball without it sticking to your fingers.
- Once done, flour the counter top of your kitchen work table and tip the dough there. Work the dough. Knead it for a good 7-10 minutes. The idea is to amalgamate all ingredients and to ensure that the yeast starts doing its job. After about 10 minutes, you should be able to achieve a smooth and elastic tendency. The ideal dough is when it springs back when pushed with 2 fingers. (That’s the test. It should bounce back).
- Once done, cover the dough with a wet cloth and keep aside for 10 minutes.
- Coat a baking pan with oil/butter (bundt pan or a wide pie dish keeping in mind that the dough will rise to double its size due to the activation of the yeast).
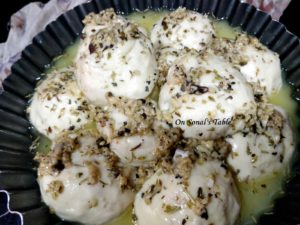
- Cut the dough into equal size pieces (about 2 inches) and form them into balls. They will be loose and springy to the touch. Insert a piece of cheese/cheese ball into the center and keep aside. Do this for all the balls.
- Dip each ball into the butter coating mix and gently lay them in the pie dish/bundt pan. If you have any leftover butter then you can pour it over the rolls.
- Cover the rolls with a wet cloth and keep them in a warm place to rise. This should ideally take about an hour.
- After an hour your rolls should have doubled in size.
- Preheat oven to 190 deg C.
- Bake the rolls at 190 deg C for about 35 minutes in a microwave or till they turn golden and crisp up. In an oven it may take lesser time so check around the 25 minute mark.
- Check the insides by performing the toothpick test (stick a toothpick into the thickest roll. If it comes out clean, then it’s cooked. If not, then increase the time by a few minutes and wait).
- Cool the rolls for five minutes in the pan before eating.